Register Yourself to get hired soon:- Register Now

Hey guy. you are here to understand the concept of reactJS and want to create your first react app then you are at the right place to know all the basics of reactJS. React is a library of the most popular scripting language javascript. if you are a web developer or You want to be a web developer you must know about javascript first. we have written basic notes for javascript to understand the basics of javascript please go back and react to our earlier Article to under better. Let’s understand the React JS step by step with code and explanations.
As everyone knows that the technology is going to increase day by day. as well as the expectation of users is also increasing and we never fulfil the requirement of the users but we can try best. So that we upgrade our technology day by day. Developers are working for that day and night. React is also an upgraded technology to build an interactive and beautiful User interface In less time.
ReactJS is a Javascript library originally developed by Facebook. It helps in building highly engaging single-page web apps. ReactJS helps in Breaking components.
Installation:-
- Firstly you need to install VS Code and NodeJS
- After installation, open windows Power shell using shortcut key(Shift+Right click and select WPS).
- write Node-version to check if Node is Installed Succesfully.
Let’s Start to learn to React with Practical web apps.
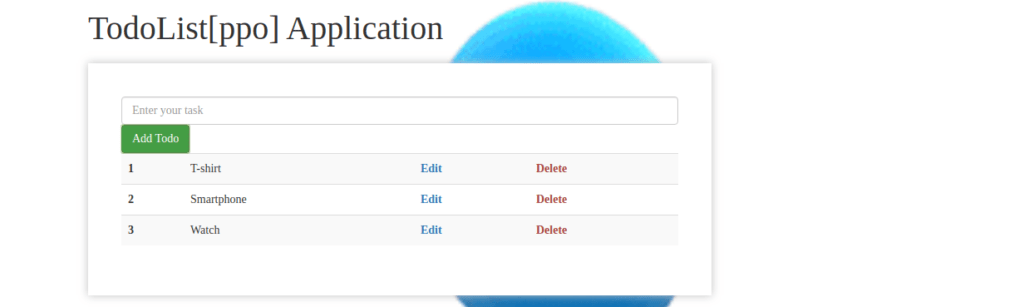
We are going to learn ReactJS by creating a TODO list Webapp.
Accenture Mass Hiring For Freshers:- Apply Now
Setting up the Development Environment:-
In Windows Power Shell Type:
NPX create-react-app App-name(todo-list)
NPX:- It is an NPM Package that is expected to be run only in a project or we can say one-time package.
By running the above code, a folder named todos-list will be created
Open the folder in vs code.
Folder Structure:-
Readme.MD:- It is used to generate HTML Summary, you can see this file at the bottom of the project.
gitignore:- Files that you do not want to push in GitHub.
Public/Index.html:– main and only HTML file of our React app this is the page that will be loaded on starting the application.
Src/Index.js:– JS file corresponding to index.html file
Src/App.js:- Main component of any react app. It acts as a container for all other components.
Src/App.css:- help in injecting styling in the react app.
Let’s Start the Development server:-
- Write npm start in VS code terminal
- open browser and go to http://localhost:3000
- you have to started your react app
Lets start to create todo app:-
Index.js is the entry point for components.
open the App.js file and you will see.
Function app(){
return(Write your code here);
}
ClassName:- This name is used for defining class instead of class because of conflict with the ‘Class’ keyword in many languages.
JSX:- It allow us to write HTML in Javascript and place themin DOM without any append chile() or createElement() method.
To write Javascript use curly braces
for example:-
<div>{20+40}</div>
#output:- 60
Importance of wrap
return (
<>
<h3>My todo app</h3>
</> #wrap
}

#note:- without wrapping a return, It will throw an error.
Integrating Bootstrap into our React:-
- From the Bootstrap starter template copy scriptsrc and paste in index.html at end of <body> tag
- Also copy.paste css <link> into your <head> of index.html
Note:- Any element with no closing tag needed a ‘/’ at the end of the instruction.
Tip:- You can use prettier Extension
Result:- your component of Bootstrap will be inserted.
This is not an ideal way of writing code. As in App.js, we create the structure of our website. we will create the structure by dividing our website into components.
Components In React:-
They are nothing but reusable javascript functions. even if the component does not depend on each other, they merge. inside a parent, component to produce the final UI.
Benefits:-
- Allows reusablily of code.
- make it eaier to find erorr.
We are creating:-
- Header componant.
- Todo and todoItem componants.
- Footer componant.
Creating header components:-
- inside src, create a folder named my componants.
- create a new file header.js
File which will contain all code for the header
We will create a function-based component in header.js
Tip:- Download or install the extension. ( ES7 React| Redux|GraphQL | R-N Snippet). It will make the development easy.
For example:- When you will write rf and then enter. you will get React Function Componant
Syntex:-
import React from 'react'
Export default function header (props)
{ return (
//statements that we want to return)
}
Props:- They are nothing but Javascript objects that are passed from parent component to child component.
for example:- using {props:title}
This means that we will be passing that title object from App.js to the header.js
In App.js, As mentioned. Every React component is merged into the main component. so we need to import the header. To import a default function type:
Syntex:
import header from header //my component

#To return the header compnent type:
function App(){
return(
<>
<Header title="todos List"/> //we have passed title="todos list"
                              //in our header componant.
<>
);}
Similarly, you can create a footer component and can pass something in it. Do it by yourself.
Default Props:- it will set the default value for the prop attributes if the parent component does not send the values.
for example:
header.defaultprops={title:"your title"}If the above code passed statement was not there or if there was an issue while importing. then the default value would show up.
Creating TODO and TODO Item:
TODO Component:- This component will be responsible for keeping track of all items included in the todos list.
TODO Item:- This component will be responsible for keeping track of the individual to-do item.
We will create a Todo list in the parent component. and then we will pass the list to todos Component
In App.js We have to import the todos.
import {Todos} from '/.mycomp/Todos'
import {TodoItem} from './mycomp/Todoitem'

Function App(){
let Todos=[
{  sno:1,
   Title:"w3hiring",
   Desc:"Jobs portal for freshers as well as experienced candidates"}
]
As we can see in the above code. we have created a javascript object named Todos containing the list of items in the Todos list.
return(
<><header title="Todos List"/> //the header we have created
                              //eirlier.
<Todos todos ={Todos}/>
</>);
}
Here we have passed the todos object to the todos component Now we need to create our todo component. create a new file todos.js in my component folder. In todos.js we have written below code
import React from 'react'
import {Todo items} from "/Todoitem";
export const Todos=(props)=>{
             return(<div classname='container">
                    <h3 classname="Text-center">Todos List:</h3>
                   {props.todos.map((todo)=>{
                   return <Todoitem todo={todo}/>
                })}
                  </div>)}
Props. todos. map:- This calls the callback function one time for each element in the array.
let’s create our third component that is Todoitem. create Todoitem.js in my Component
import React from 'react'
export Const TodoItem=({Todo,Ondelete})={
                   return (<div>
                   <h4>{Todo.Title}</h4>
                   <p>{Todo.Desc}</p>
)}
Open the server and all items of our TodoList are displayed succsessfully
Now we will create a delete Button to delete items from the to-do list. To create the delete button we will use the state in React and in the App.js file we will write. following code.
import React,{usestate} from 'react';UseState is a hook that lets you add react state to the function component

function App(){
Const ondelete=(todo)=>{
setTodos(Todos.filter((e)=>{
             return e!==todo;}));
}
const[Todos.setTodos]=usestate([
{  sno:1,
   Title:"w3hiring",
   Desc:"Jobs portal for freshers as well as experienced candidates"}
return(<>
<header Title='Todos List"/>
<Todos todos={todos} on delete={on Delete}/>
</>;}
In the above code, we have created an on delete function which will be called once the user clicks on the delete button. Inside the return function, we have passed the on delete attribute to the Todos component.
Open the Todos.js File.
export const Todos=(props)=>{
return(//earier code)
{
Props.todos.length==0?"No Todos to desplay";
Props.Todos.map((todo)={Todo}
key={todo.sno} Ondelete={Props.on delete}/>
})
In the above code, we are checking the length of the todos. so the user deletes all todo items/length=0). then “No Todos to display” will be shown.
In the Todoitem.js file.
export const Todoitem =({Todo, Ondelete})=>{
            return{
                    <div><h4><Todo.title}</h4>
                    <p>{Todo.desc}</p>
<button classname='btn btn-sm-btn-danger" Onclick={()=>({Ondelete(todo)}}>
Delete</Button>
)}
in the above code, We have created a delete button, which will call the ondelete function once the user clicks on it and the particular todo item will be removed.
Assignment for you.
please create by own you own.
In a similar fashion, you can create AddTodo.js file. You can simply do it by creating a new item, from a form, gets added to our list. (without reloading the page)
React Router:-It enables navigation among views of various components in React app. allow changing the browser URL and keep the UI sync with the URL.
install:- in terminal write
npm install react-router-dom
Visit Documentation of React router and import react-router-dom by simply copying it. Wrap our app using React Router <router></router>. To specify some components for rendering we will use switch
<Switch>
<Router exact path="/" render={()=>{ return(<>
<Add Todo addTodo={addTodo}/>
<Todos todos={todos} Ondelete={Ondelete}/>
</>)
}}>
</Router>
<Router exactpath="about"> //will be render if path is /about
<About/>
</Router>
</switch>